Announcements
Welcome to Servikus Tutorials Area! You will find a ton of useful tutorials in our tutorial area. We hope that you will find them useful! If you want custom tutorial created, please let us know and we will create it for you!
-
Advanced tutorials
Tutorials aimed for advanced users and, mostly, Dedicated Servers owners.
-
Basic tutorials
-
cPanel
cPanel related tutorials
-
Domain tutorials
-
WordPress
WordPress related (installation, plugins, tips etc)
Full website backup and restore from cPanel & WHM
Backup
Backup is a very useful option that you have at your disposal within cPanel. Backup allows you to download compressed copy of your whole site or some of its parts. Whatever you find useful. You can download, for example, your home directory, e-mail configurations, databases and so on. This way you can restore state and settings of your whole website from a certain point of time.
This is a step-by-step guide on how to generate and download full backup of your site!
Full backup includes your home directory, databases, email forwarders, and filters.
Note: You cannot restore full backups through your cPanel interface!
Step 1: Login into your cPanel account. You need to click on “Backups“. It’s located under “Files” box.
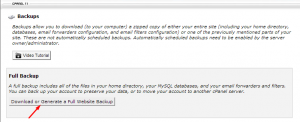
Step 2: New page will open. Here you can select backup option that suits your needs best. In this case you will need to click the “Download or Generate a Full Web Site Backup” button.
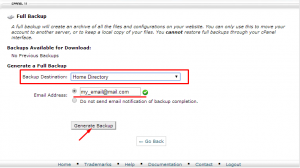
Step 3: Now you need to select “Home directory” from the “backup destination” box, or other destination that suits your needs better. Then enter your e-mail address. Next step is to click on “generate backup”.
Step 4: As soon as generating full backup is done you will receive confirmation e-mail which informs you that generating full backup of your website is done.
Step 5: Go to your cPanel home page. Select “Backups“, located under “Files” box. Under “Backups Available for Download”, select a backup file that you want to save on your computer. Click “Save file” and download will begin.
When it finish you should be able to see file similar to this “backup-date of creation_name of account.tar.gz” in your website root directory. You can download it locally (to have backup in case of server hardware failure) or you could leave it there if you want to restore now (in this case it will be much faster).
Restore
Note: For this portion of tutorial you need to have WHM access!
Step 1a: In case you downloaded backup file locally and deleted it from server now you need to upload it via FTP (or SSH) because it must be in one of these directories on the server: /home, /home2, /home3, /root, /usr, /usr/home, /web.
Step 1b: In case you left backup file on server you need to navigate to your website root directory and transfer it to one of above mentioned directories. For example:
# cp backup-7.15.2014_17-51-45_zombi110.tar.gz /home
Your backup file will be stored now in /home!
Step 2: Login into WHM.
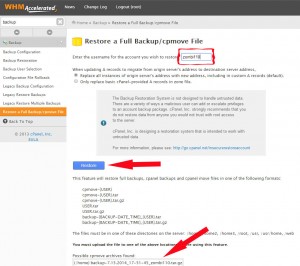
Step 3: Navigate to Backup -> Restore a Full Backup/cpmove File:
Step 4: Check if your backup file is visible at the bottom of this page and enter the name of account you wish to restore. After that press Restore:
Note: If that account already exists on server you need to Terminate it in order to Restore this one!
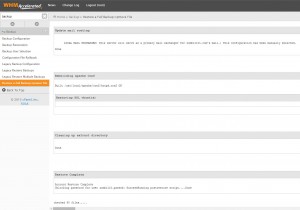
This screen informs you that Restoring of your account is done. Congrats!


============================================================================